Water Heater Maintenance: A DIY Guide to Extend Lifespan and Prevent Unexpected Problems
Regular maintenance isn’t just about extending your water heater’s lifespan and boosting its efficiency—it’s also about keeping you in the know. By performing routine checks, you can spot potential issues early, plan repairs or replacements proactively, and avoid those dreaded cold showers. This DIY guide will walk you through the water heater maintenance process, including removing debris and sediment that can build up and cause problems over time.
What You’ll Need:
- Garden Hose long enough to reach the closest tub or shower
- Flat-head screwdriver (for some drain valves)
- Teflon tape
- Pliers
- Safety glasses
Safety First:
- Electric: Switch off the breaker in your electrical panel.
- Gas: Turn the gas control knob to “Pilot” or “Off.”
- Let the water cool: Allow at least an hour for the water in the tank to cool down.
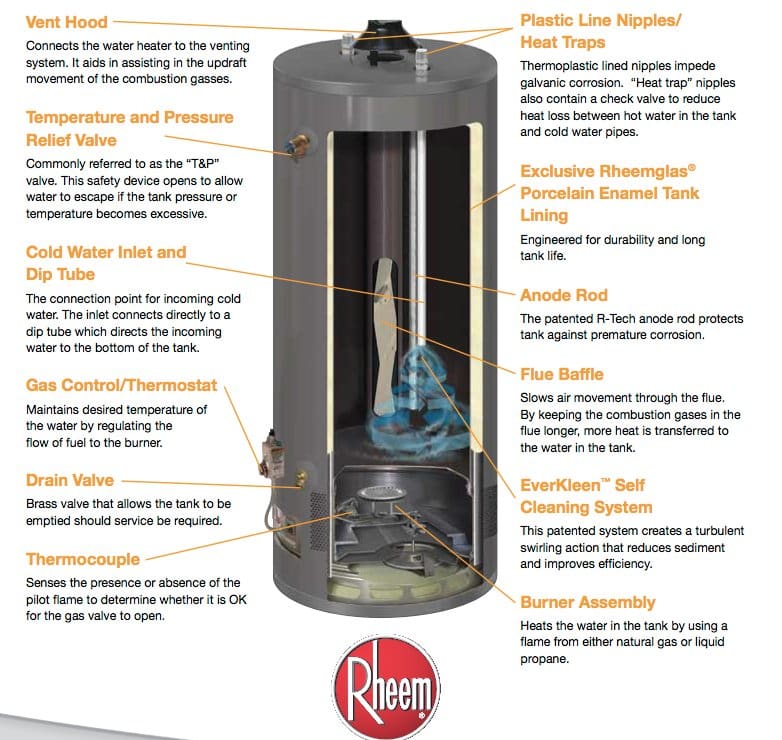
Check the Pressure Relief Valve
- Locate the valve (usually on top or side of the tank).
- Briefly lift the lever to release some water. If it doesn’t flow freely, the valve may need replacing.
Flush the Tank
- Attach a garden hose to the drain valve near the tank’s bottom. If the valve is plastic, tighten the hose only enough to prevent leaks.
- Extend the hose to a bathtub or shower drain.
- Open a nearby hot water faucet to prevent a vacuum.
- Slowly open the drain valve, letting water flow into the tub/shower.
- Close the cold-water supply valve to the heater.
- Flush until the water runs clear (or drain the tank completely for best results).
- Close the drain valve tightly.
Inspect the Anode Rod (if applicable)
- Locate the rod (a long metal rod inside the tank).
- Using your pliers remove the anode rod from the top of the tank.
- If it’s heavily corroded or less than 1/2 inch thick, replace it (plumbing supply stores will carry these).
- Apply Teflon tape to the anode rod before replacing.
- Reinstall if it’s in good condition.
Additional Checks
- Inspect for leaks around the tank, pipes, and valves.
- Check the thermostat setting (around 120°F is recommended).
- For gas water heaters, clean the burner and flue to remove dust and debris.
Refill the Tank
- Ensure the drain valve is closed tightly.
- Slowly open the cold-water supply valve.
- Open a hot water faucet and let it run until the flow is smooth, indicating a full tank and no air in the lines.
Turn the Power Back On
- Electric: Switch on the breaker.
- Gas: Follow the manufacturer’s instructions to relight the pilot.
Water Heater Maintenance DIY Notes
- Frequency: Flush your water heater at least once a year, more often with hard water.
- Professional Help: If you’re unsure or have issues, call a qualified plumber.
Remember:
- Safety first!
- Consult your owner’s manual for specific instructions.
- If in doubt, call a professional.
By following these Water Heater Maintenance DIY steps, you can help your water heater run efficiently and reliably for years, providing consistent hot water.
Inspired to Transform Your Space?
Ready to bring your home remodeling dreams to life? From custom cabinets to complete renovations, we’re your partner in creating the home you’ve always wanted.
On our “Our Projects” page, you can explore our past projects for inspiration. Then reach out through our “Contact/Follow Us” page to discuss your ideas. Let’s collaborate and create a space that truly reflects your style and needs!
You can also see some of our reviews from clients here. This will give you a sense of their experience working with us;

